
Two hundred posts in a little under a year is something of a milestone. What began as an attempt to generate readers for my fiction has almost become a way of life.
I had planned to place this non-writing post as number 200, in celebration, until scheduling issues got in the way. You see, writing a blog isn’t the first activity that I began for the sake of my fiction — which then went on to take over my life. In the early eighties it was clear that I wan’t going to make a living writing novels, and needed a day job. I began working as a substitute teacher to earn some extra money. I was strong, loud, and male so they sent me to middle schools. Substitute teachers don’t like middle school. If you think back a bit, I won’t have to tell you why.
Maybe I’m odd, but I thought the kids were a hoot. I told the dispatcher that I actually liked middle school kids, and suddenly I had full employment. After a year, I went back for my credential (I already had two masters degrees) and got a job at one of the small rural middle schools where I had substituted. I taught there for twenty-seven years, mostly science.
It was an underfunded school and I was a carpenter, so I built a lot of my own science equipment. I shared some of that in posts 201 and 202. A lot of the curriculum sent down from the state was crap, and I was a writer, so I wrote a lot of my own material. I had less hassle from the bosses than most of my friends because good science teachers are hard to find. Ones who aren’t just biding their time, waiting for a chance to move on the high school, are even more rare.
I kept on writing, but at a reduced output. It wasn’t how I had planned my life, but it worked. I once figured out that about 4000 students passed through my classroom during my tenure. I’m proud of that.
Now that I’m retired, I am writing this blog and its sister blog Serial four days a week. Now that’s a day job. This post provides the details about the last big project I built for my science classroom. Pass this on to your science teacher friends.
From this point on, things get technical. If you are a planet geek or a DIY person, you will probably enjoy the details, even if you don’t need the product. Maybe you could make one for your kid’s school?
*****
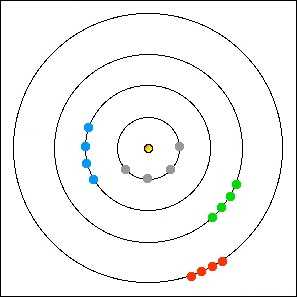
You can show the scale of the solar system with a model you build yourself (see post 202), but showing how the planetary orbits interact with one another takes some time. I figured out how to do it near the end of my career by building a poster that changed over the course of a school year.
You need a piece of hardboard, 6 ft by 6 ft, 1/8 inch thick, a pint of black or blue-black paint, four tubes of artist’s acrylic (pale gray, blue, green, and red), a one-inch brass drawer pull, four foam daubers, (half inch diameter foam cylinders attached to the end of a dowel, used for laying down stencils), and a measuring device you will have to make yourself.
You find the center of the hardboard poster by running lines from corner to corner; they cross at the center. There you drill a 1/8 inch hole and feed the bolt for the drawer pull from the back. Add a matching nut on the front, tighten, then add a drop of Super Glue to keep things from moving. After you paint the board black or blue-back, spin the drawer pull onto the bolt to represent the sun.
For the four colored circles which will represent the inner planets in their initial position, you will need to go to the website www.theplanetstoday.com. Use the double headed date arrow at the top of the page to chose the date of your initial array. Use the measuring device (building instructions below) to establish each distance from the sun and, referring to the website, make your best visual estimate of where to initially put each planet on its trip around the sun.
At the outset, it won’t look like much, but every week you will add another four dots. By the end of the year Mercury will have circled the sun more than twice, Venus nearly once, Earth about eighty percent of the way, and Mars will have moved a fairly short distance – given the length of a typical school year. I put on new planet circles every Wednesday, since Wednesday almost never has a holiday.
Your students will soon have a clear picture of how the planets move in relationship to each other. When Venus is visible in the west at sunset, or in the east at sunrise, or is not visible at all in the night sky, your wall chart will show them why – assuming that you explain it to them, and keep them at least somewhat excited with assignments like, “What is that red dot in the sky, half way up from the eastern horizon at eight o’clock tonight?”.
The measuring device you will build allows you to place additional planet-circles at the appropriate places for subsequent weeks. It has a single 1/8 inch hole at the left, and eight larger holes. Once a week you will remove the drawer-pull-sun and put the small left hole over the bolt. Place the initial Mercury-hole over the previous week’s Mercury circle and put on a new pale-gray circle into the other Mercury hole, using a dauber. Repeat for all four planets —Mercury pale gray, Venus blue, Earth green, and Mars red. Replace the sun drawer pull and you are done for the week.
 To build the measuring device, begin with a piece of hardboard 36 inches wide and seven inches high. Draw a line about 1 1/2 inches above the bottom and parallel to it. Clearly mark a point on the line about 1 inch from the left side. This will locate the sun-hole. When all further measurements have been made, an 1/8 hole will be bored at the sun-point and 5/8 inch holes will be drilled at the four pairs of planet-points. Don’t drill anything until all nine holes have been marked accurately.
So far, I have used feet and inches since we have been talking about carpentry. The rest of the dimensions will be in millimeters.
On the base line, measure 215 mm from the sun-point and put a point for Mercury. Continuing on the base line, and still measuring from the sun-point, put a point at 402 mm for Venus, a point at 557 mm for Earth, and a point at 848 mm for Mars.
Each planet needs a second hole, the distance between the two representing the distance the planet moves in one week. For me, these required four radii and four calculated angles. I have simplified (honest, it’s simpler) by giving dimensions above (perpendicular to) the base line, and back toward the sun (parallel to the base line).
For Mercury, this will be 104 mm up and 26 mm back toward the left.
For Venus, this will be 78 mm up and 8 mm back toward the left.
For Earth, this will be 67 mm up and 4 mm back toward the left.
For Mars, this will be 53 mm up and 2 mm back toward the left.
These twin dimensions place the pairs of planet-points at two points on a correctly dimensioned circle, representing the orbit.
Drill the sun hole 1/8 inch to match the bolt holding the drawer pull. Drill the eight planet points 5/8 inch to allow clearance for the 1/2 inch dauber. The outline of the measuring device can be trimmed down to any convenient shape, as long as it encloses all nine holes.
